FISHING KNOTS
THE KNOTS YOU NEED TO KNOW
The proper knot is very important in ensuring you bring your fish to the boat and there must be a thousand different knots
people use. When starting out, keep it simple and stick with these basic knots. What you are looking for in a knot is:
1) Strength: Anytime you bend or kink a fishing line, you weaken it. Knots weaken a line but some are stronger than others.
Go to this Sports Fishing Magazine web site, , and read their article on knots, good information.
2) Ease of tying: You want to be able to tie it quickly. This is why a lot of people don't use the Bimini twist, although once
you get used to it, any knot is easy to tie.
3) Purpose of knot: You will need to learn some specialty knots for specific purposes. Different knots are needed for tying a
line to a hook, two lines together, to make a loop, tying braid to your leader, etc.
There are numerous sources for learning to tie fishing knots. The ones presented here are what I consider the basics and
have worked for me. Learn the basic ones listed, then move out to other ones that seem to work for you.
THE RULES OF KNOT TYING
There are basic rules that apply to the tying of all knots. Your knot will normally be the weakest link between you and the fish.
Knowing and adhering to these rules will reduce the number of fish you lose.
RULE 1: Be thoroughly familiar with all the knots you tie and continually practice tying them.
RULE 2: Always lubricate knots before tightening them, either with saliva or water. (No oils, WD40). Knots are highly
susceptible to heat friction. Do not draw a knot quickly as this can generate heat damaging the line.
RULE 3: Give a few test pulls on the newly tied knot.
RULE 4: As a general rule of thumb, smaller line requires more turns or wraps. Larger lines require less wraps.
RULE 5: Braided line normally requires you to double your braided line when tying the knots.
RULE 6: Keep the knot open as you take up slack slowly.
RULE 7: Avoid overlapping or kinked line.
RULE 8: If it does not look right, retie it. Takes a little more time, but you have spent a lot of time getting that fish on the hook.
Better to take the time to retie it.
TRIMMING TAGS
Tags should be trimmed to an appropriate length and trimmed with a pair of clippers or a knife as opposed to teeth.
WHY KNOTS FAIL
Knots fail for a number of reasons. Slippage is the most common and is usually due to insufficient wraps in the knot or
trimming the tag end too short. Slippage is also a major factor in the second common cause of knot failure – heat damage
due to friction. Insufficiently tightened knots often fail when sudden pressure is applied to them, such as the strike of a fish.
Lastly, knots can also fail when one strand of line cuts another. This is most common when lighter lines are joined to heavier,
thicker lines. In knots where one line cuts across another, such as in the Overhand knot, the strength of the knot is reduced
by as much as 50%. In all knot tying the aim should be to reduce the chance of failure and retain as much line strength as
possible.
If you have a break off, inspect the end of your line.
Is the line roughened and the end straight? If so, it probably broke at a weak spot in the line, possibly caused by abraision
against metal, rock, or tree bark.
If the end is curved sharply, then your line broke at the knot.
TYING KNOTS IN LIGHT LINE
Knots in light lines, or lines under 6 lb test, pose unique problems. Small errors in technique will cost you more when tying
these knots as opposed to in heavier line. Extra care should be taken with light line knots and any knot modification or
improvement should be utilised. Using an extra wrap or two in a specific knot is a good idea in light line. Doubling the line is
also recommended to strengthen the knot. Always leave a sizable tag end when tying a light line knot.
TYING KNOTS IN HEAVY LINE
Heavy line knots have their own associated problems. Most problems are related to the physical difficulties of twisting or
wrapping thick line. Knots on line 60 lb test and higher can be tied, but need modifications.
First, twists and wraps in knots need to be reduced.
Heavy line knots also need to be tightened with care and up to 50% of the lines breaking strain in pressure needs to be
applied.
Pulling the tag end of the line is also advisable.
Finally, melting the tag end to a stopping blob using a flame is worth doing, while taking care not to damage the main line.
Again, I would recommend Vic Dunaway's book "Bait, Rigs, and Tackle"
as a good reference book.
Some good web sites for learning to tie knots are:
GROG'S FISHING KNOTS
NET KNOTS
FISH 4 FUN
YOU TUBE KNOTS
SPORT FISHING MAGAZINE ARTICLE ON BREAKING STRENGTH OF VARIOUS KNOTS
SALTWATER SPORTSMAN ARTICLE
FLORIDA SPORTSMAN KNOT ARTICLE
A SCIENTIFIC ARTICLE ON KNOTS IF YOU ARE REALLY INTERESTED
MONOFILAMENT LINE TEST
KNOTS 101 "FLY FISHERMAN'
SALTWATER SPORTSMAN ESSENTIAL CONNECTIONS
FLORIDA FISHERIES KNOTS
NORTHAMPTON NENE ANGLING CLUB
STEELHEADER.net
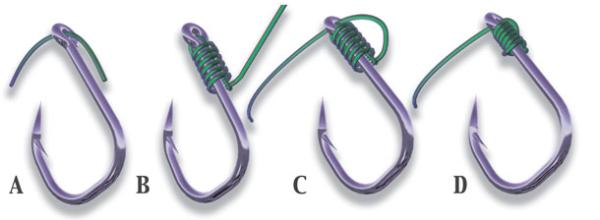
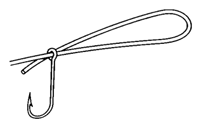
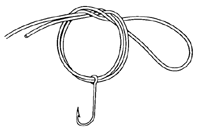
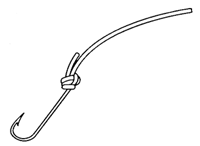
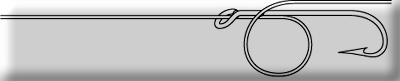
| TYING YOUR LINE DIRECTLY TO YOUR HOOK. When tying your hook directly to the line or leader, you always want to enter the eye of the hook from the barb side. This will result in a much better hook up ratio. The twice through Palamar knot is suposed to be the strongest knot to use when tying directly to your hook. PALOMAR KNOT 1. Double about 5 inches of line, and pass through the eye. Alternatively, if the eyelet is small, insert the end of the line through the eyelet, pull some line through, then insert the end back through the eyelet the opposite way, forming a loop. 2. Tie a simple Overhand Knot in the doubled line, letting the hook hang loose. Avoid twisting the lines. 3. Pull the end of loop down, passing it completely over the hook. 4. Pull both ends of the line to draw up the knot. Click these links for other explanations and pictures of tying the Palomar Knot. PALOMAR KNOT GROG'S ANIMATED PALOMAR KNOT UNI KNOT Sometimes the hook eyelet is not big enough to take a doubled line. In this case, I use the basic UNI knot. (You will have to double braided line) CLICK below for some more links on tying the UNI knot. UNI KNOT GROG'S ANIMATED UNI KNOT And, another "strongest knot in the world" for attaching your line/leader to a hook is by SNELLING it. And, some people believe a snelled hook results in a better hook up ratio as it helps to set the hook. There are several ways to snell hooks, but I have found these two methods the easiest for me. 1. Snelling a hook to a leader when you have both ends of the line available to you. A. First pass the tag end of the line through the eye of the hook from the front of the hook. Only pass it through about half an inch. B. Hold the shank of the hook and the half inch tab end and wrap the main-line around both the shank of the hook and the tab end 7 or 8 turns. C.Pass the main line back down through the eye of the hook from the back of the hook. D.Pull the main line tight while holding the hook to set the snell. There should be very little or no tag end protruding when the knot is set. If the hook curls up towards the trace you have snelled the hook correctly. (www.fishingkites.co.nz) For another explanation on how to tie this snell, go to Hull Truth Hook Snelling blog 2. Snelling a hook to a main line (You do not have access to both ends of the line like a leader above). I prefer the UNI just to keep things simple. Thread the end of your line through the eye of the hook, again from the hook side of the hook. Form the uni circle and hold it tight against the hook shank with your thumb and finger. Make 4-5 turns around the shank and through the circle. Moisten the knot and pull on the tag end to draw the knot roughly closed. Tighten the knot by holding the standing line in one hand and the hook in the other and pull them in the opposite direction to tighten the knot. There is one exception to entering the hook from the hook side - when you are using a "down eye" hook. On these hooks, the eye is turned downward, which allows the line to enter from the top end of the hook. |
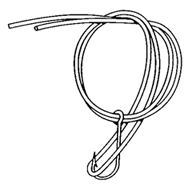
TYING YOUR LINE TO A LEADER
Although you can always attach your leader to your main line with a swivel using one of the above knots, sometimes it is
better to have a line to line connection, especially when throwing light lures/jerk bait/DOA/Gulps.
LIGHT MAIN LINE (20lb or less) TO LEADER
This requires tying two knots, a loop in your main line and then tying your leader to this loop.
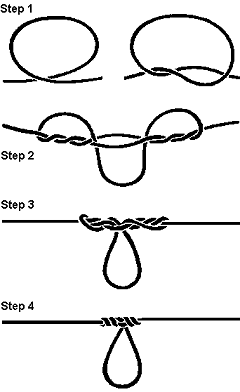
MAKING A LOOP IN YOUR MAIN LINE: I normally use the Spider Hitch to tie the loop in the main line. (The Bimini
twist is stronger and works fine also, but some people find it more difficult to tie)
ANIMATED SPIDER HITCH KNOT
TYING YOUR LEADER TO THE MAINLINE (USING LOOP CREATED ABOVE)
Two knots may be used for this. The Yucatan is the strongest but the No Name knot is used in this area.
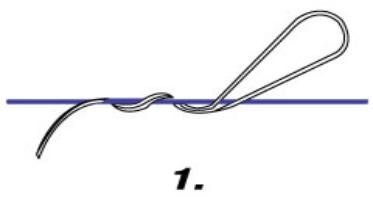
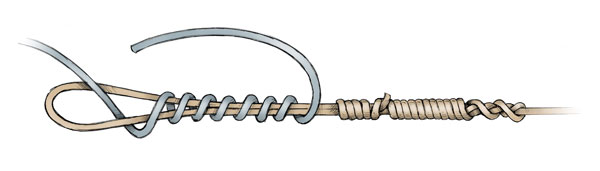
YUCATAN KNOT
(Also known as the Worm Knot, Reverse Albright knot)
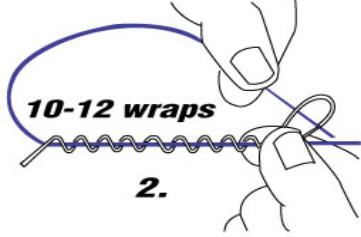
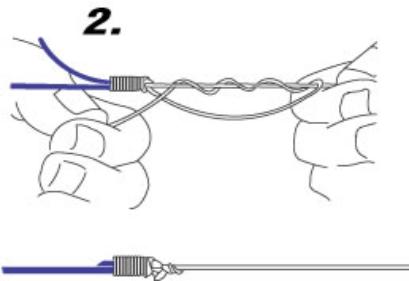
This knot is meant for joining a double line (monofilament or braided lines) to a leader.
Leaving a small loop, make 4 - 5 wraps for a monofilament main line or 10 - 12 wraps for a braid main line around the
leader line.
Then pass the leader tag end thru the loop as shown in the diagram.
Moisten the line and draw the knot tight slowly and carefully, watch out for the braided lines. You can choose to terminate
the knot as such and it will be the same as a Yucatan knot.
If using braid for the main line, you can lock the knot better by using the tag end of the braided line and making a few half
hitches around the braided line.
This shows the finished knot.
Click below for another view of tying the Yucatan knot.
LEADERTEC: HOW TO TIE THE YUCATAN KNOT
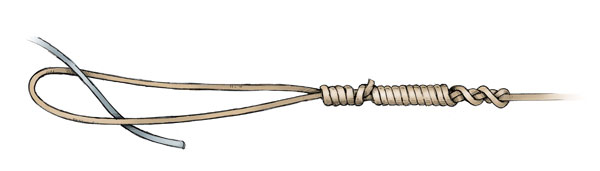
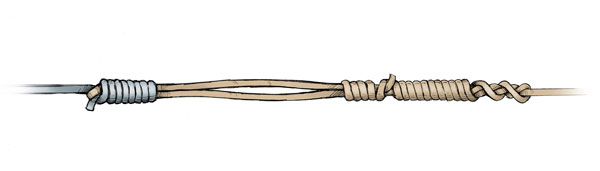
A variation of the Yucatan knot is the No Name or Bristol knot. It is
essentially the same but the leader vs the looped main line is used to wrap the line.
1.Pass the leader through the end loop.
2. Keeping your index finger hooked around
the leader, wrap the leader five to seven
times around the doubled line.
3. Pass the leader back through the loop
formed by your index finger. Bring the end
out six inches.
4. Cinch down the knot very tightly by
moistening it and pulling down on the leader
and double line. Trim the tag end, which
should protrude at a 90-degree angle.
For more views on tying the No Name knot, click below:
YOU TUBE VIDEO OF NO NAME KNOT
SALTWATER SPORTSMAN NO NAME KNOT
MAIN LINE (>20 LB) TO LEADER
For heavier lines, you will want to use either a swivel to provide attachment points to the leader and main line and use
either a Uni or Palomar knot to tie to the swivel.
SWIVEL:
UNI TO UNI:
Although you can always attach your leader to your main line with a swivel using one of the above knots, sometimes it is
better to have a line to line connection, especially when throwing light lures/jerk bait/DOA/Gulps.
LIGHT MAIN LINE (20lb or less) TO LEADER
This requires tying two knots, a loop in your main line and then tying your leader to this loop.
MAKING A LOOP IN YOUR MAIN LINE: I normally use the Spider Hitch to tie the loop in the main line. (The Bimini
twist is stronger and works fine also, but some people find it more difficult to tie)
ANIMATED SPIDER HITCH KNOT
TYING YOUR LEADER TO THE MAINLINE (USING LOOP CREATED ABOVE)
Two knots may be used for this. The Yucatan is the strongest but the No Name knot is used in this area.
YUCATAN KNOT
(Also known as the Worm Knot, Reverse Albright knot)
This knot is meant for joining a double line (monofilament or braided lines) to a leader.
Leaving a small loop, make 4 - 5 wraps for a monofilament main line or 10 - 12 wraps for a braid main line around the
leader line.
Then pass the leader tag end thru the loop as shown in the diagram.
Moisten the line and draw the knot tight slowly and carefully, watch out for the braided lines. You can choose to terminate
the knot as such and it will be the same as a Yucatan knot.
If using braid for the main line, you can lock the knot better by using the tag end of the braided line and making a few half
hitches around the braided line.
This shows the finished knot.
Click below for another view of tying the Yucatan knot.
LEADERTEC: HOW TO TIE THE YUCATAN KNOT
A variation of the Yucatan knot is the No Name or Bristol knot. It is
essentially the same but the leader vs the looped main line is used to wrap the line.
1.Pass the leader through the end loop.
2. Keeping your index finger hooked around
the leader, wrap the leader five to seven
times around the doubled line.
3. Pass the leader back through the loop
formed by your index finger. Bring the end
out six inches.
4. Cinch down the knot very tightly by
moistening it and pulling down on the leader
and double line. Trim the tag end, which
should protrude at a 90-degree angle.
For more views on tying the No Name knot, click below:
YOU TUBE VIDEO OF NO NAME KNOT
SALTWATER SPORTSMAN NO NAME KNOT
MAIN LINE (>20 LB) TO LEADER
For heavier lines, you will want to use either a swivel to provide attachment points to the leader and main line and use
either a Uni or Palomar knot to tie to the swivel.
SWIVEL:
UNI TO UNI:
| SPECIALTY KNOTS With certain lures or types of fishing, you will need to use some specialty knots. DROPPER LOOP KNOT One way to make a bottom rig is to use 3 way swivels. If you do not want to use a 3 way swivel, you can use this knot. It will make the line stands out at a right angle to your main line. The loops can be made long enough to have a hook set on them, but that isn't necessarily the best presentation for many fish. Form a loop in the line. Step 1: Take hold of one side of the loop, and make 6 or more turns around the line itself. This is the tricky part - keep open the point where the turns, or twists, are being made. Some people put a pen, pencil, etc in it and twist the pen around to make the twists. Step 2: Take hold of the other side of the loop, and pull it through the centre opening. Use a finger in this loop so that it is not lost. Step 3: Hold this loop between the teeth or put it around something else leaving your hands free. Pull gently on both ends of the line, making the turns gather and pack down on either side of the loop. Step 4: Draw up the knot by pulling the lines as tightly as possible. The turns will make the loop stand at right angles to the line. For an animated version, click below: NET KNOTS DROPPER LOOP (ANIMATED) LOOP KNOT HOW TO TIE A SPINNER BAIT TO YOUR LINE RAPALA KNOT - Allows your lure to move more freely and thus more live-like action. Tie an overhand knot. Leave 5" of free end. Run free end through the eyelet. Run free end back through overhand knot. Wrap free end around standing part of line 3 times. Thread free end through back of overhand knot. Pass free end through loop that is formed. Moisten line and draw up tight. Trim excess. |


picture coming

KNOT NOMENCLATURE:
TAG END: The end of the line that you work with in tying knots. Also called the "Bitter End", "Trace End"
STANDING PART: The main length of line.
On average, any knot will reduce the breaking strength of any line or rope by about 15%.
TAG END: The end of the line that you work with in tying knots. Also called the "Bitter End", "Trace End"
STANDING PART: The main length of line.
On average, any knot will reduce the breaking strength of any line or rope by about 15%.
A NOTE ABOUT TYING KNOTS WITH BRAID
,
,
picture coming